Cross Reference / Join / Junction Table
I would like to associate the new AspNetApplications table to the users table. If I want a user to be allowed access to multiple Applications and I want Applications to be assigned to many users, I have a Many-To-Many relationship. Now I can’t just associate my Applications table and my Users table directly. The Normal Form police will come knocking at my door.
What we need is a Cross Reference (or XRef) table. I have seen these types of tables called Join Tables, Junction Tables, Cross Reference Tables, etc. I just call it an XRef table. This table will turn our Many-To-Many table relationship into a manageable One-To-Many.
We need our Migrations to create the table and associate like this…
Cross Reference Table</figcaption></figure>Again, in keeping with the naming convention that Asp.Net Identity is using, I will call the new xfref table AspNetUserApplications.
The new table only needs an Id field to associate to the User table and another Id to associate back to the Applications table. To make every record unique, we will need to make both of these fields (which I named UserId and ApplicationId) key fields. So now we have a Composite Primary Key.
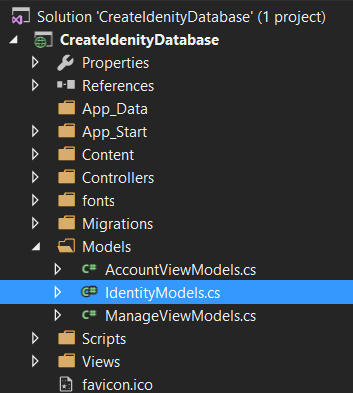
So….back into our IdentityModels.cs file…
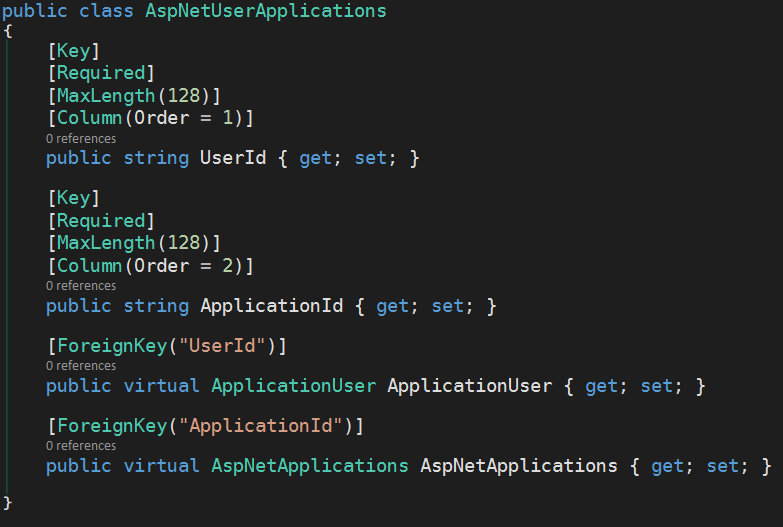
We need to create a new class named AspNetUserApplications. Here is the code:
Looking at the Annotations again, you can see we used the [Key] annotation but we also used the [Key] annotation on our second field. EF Code First will create both of these fields as primary keys of our table. As we mentioned earlier, we will have a Composite Primary Key on this table.
We have seen the [Required] and [Maxlength()] annotations before. The new one this time is the [Column] annotation. Here we want to signify an order for our columns when EF creates the table. If we put an Order attribute on our [Column] annotation, we can set which order our columns will appear in the table.
Setting Foreign Keys
This part took me a little digging to figure out. We want the UserId to be a foreign key to the AspNetUser table and the ApplicationId to be a foreign key to the AspNetApplications table.
To do this, we need properties. First, we create an ApplicationUser property. The type here is the ApplicationUser class that is in this same IdentityModels.cs file. The ApplicationUser class gets generated for us and EF will turn this class into the AspNetUser table in the database. We will give this property a [ForeignKey] annotation and set the foreign key to to the UserId property in our class. EF will auto-magically tie our UserId field to the Id field in the AspNetUsers table (via the ApplicationUser class).
We also need a property to tie to our AspNetApplications table. From the code you see that we have a property in our AspNetUserApplications class called AspNetApplications and this property is of type AspNetApplications (the class we created in Part 4). The [ForeignKey] annotation here will mark our ApplicationId field as the foreign key to our AspNetApplications table (via the AspNetApplications class).
If this seems a bit confusing, don’t worry, I was lost at first. It took a day for this to “sink in” for me.
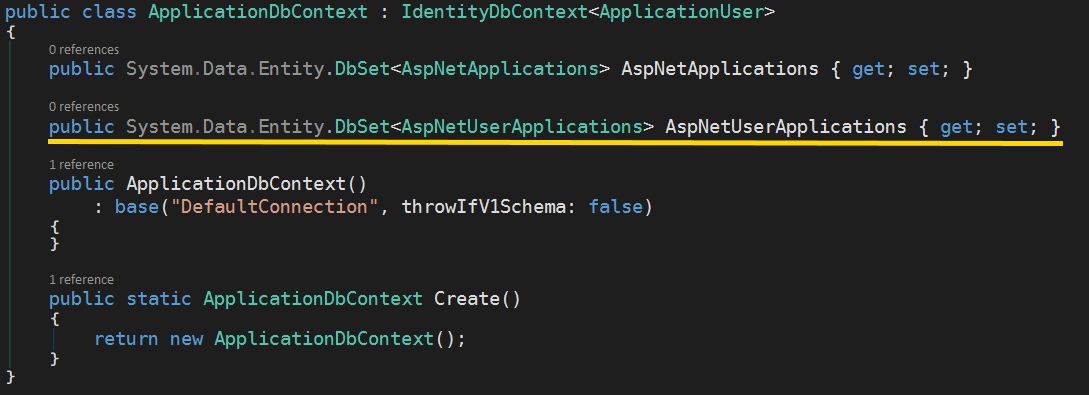
The last step on creating this table is again to tell the dbContext to create this table. We accomplish this by adding another property to our ApplicationDbContext class.
Now we have an ApplicationDbContext class with the two tables we want to add, the AspNetApplications and the AspNetUserApplications.
Next, we will finally start the EF Code First Migrations that build the database.


