Pure API Project
I wanted to do a series on using Asp.Net Core 2 and Asp.Net Identity and expand that and customize it quite a bit….
but…
Only using an Web API project. I could not find anything like that. Every other post I could find on the subject would mix in an MVC project and things got confusing.
If I were to create a pure Web API that would be consumed by a UI such as Angular or React, I didn’t want to cram all of that stuff together. I wanted to keep them very separate and perhaps work the UI project after the main part of the development on the API was complete.
Underway
Let’s start by creating a new Asp.Net Core 2.1 Web API application. I am assuming that you have the needed .Net Core SDK loaded on you machine. If you don’t, you can go here to get it.
Create The Initial Project
Open a Powershell window and navigate to a directory where you would like your new project to be created. Once there, lets type in the needed magic words to create a boilerplate Web API project for us.
1
PS C:\temp\apothecaric> dotnet new webapi "YourApiName"
Fix The Default Files
After that completes, look for you csproj file and open it. After Visual Studio loads, locate the default “ValuesControler” file. I have removed all of the endpoints from this file except for the default GET. I will use this later on to test the authentication/authorization that we will build into the app.
Your ValuesController.cs file should look about like this:
1
2
3
4
5
6
7
8
9
10
11
12
13
14
15
using Microsoft.AspNetCore.Mvc;
using System.Collections.Generic;

namespace ApothecaricApi.Controllers
{
  [Route("api/[controller]")]
  public class ValuesController : Controller
  {
    [HttpGet]
    public IEnumerable<string> Get()
    {
      return new string[] { "value1", "value2" };
    }
  }
}
Unlike the .Net Framework’s Asp.Net Web API, the Asp.Net Identity is already part of Core 2 so we won’t have to import that.
Connection Strings
The first thing I would do here is to set a connection string in the appsettings.json. Your file should look about like this:
1
2
3
4
5
6
7
8
9
10
11
12
13
14
15
16
17
18
{
  "ConnectionStrings": {
    "AuthenticationConnection": "Server=172.22.0.20;Database=ApothecariAuthentication;User Id=sa;Password=Reallybitchinpassword1!;"
  },
  "Logging": {
    "IncludeScopes": false,
    "Debug": {
      "LogLevel": {
        "Default": "Warning"
      }
    },
    "Console": {
      "LogLevel": {
        "Default": "Warning"
      }
    }
  }
}
First Files
I will create a custom Db Context here that will be expanded later. For now, there will not be much to it. So, I created a file called ApothecaricDbContext.cs and put that in a Data folder in my solution.
This file will inherit from the Core’s IdentityDbContext. With this, we will be able to use Migrations and create the initial database will all of the default Asp.Net Identity tables in it. The custom Db Context file should look like this:
1
2
3
4
5
6
7
8
9
10
using Microsoft.AspNetCore.Identity.EntityFrameworkCore;
using Microsoft.EntityFrameworkCore;

namespace ApothecaricApi.Data
{
  public class ApothecaricDbContext : IdentityDbContext
  {
    public ApothecaricDbContext(DbContextOptions options) : base(options) { }
  }
}
As you can see, nothing much going on here. You will end up adding the using statements for “Microsoft.AspNetCore.Identity.EntityFrameworkCore” and “Microsoft.EntityFrameworkCore”.
On The Way To Migrations
With this, we can now create our initial Migration. The first set would be to register our new Db Context as a service in our Startup.cs project file. Find the ConfigureServices method and we will add the following code to add out Db Context file to the project and configure the connection string and tie it to the Db Context also.
1
2
3
4
5
6
7
8
9
// This method gets called by the runtime. Use this method to add services to the container.
public void ConfigureServices(IServiceCollection services)
{
  services.AddDbContext<ApothecaricDbContext>(options =>
                    options.UseSqlServer(Configuration.GetConnectionString("AuthenticationConnection"),
                           b => b.MigrationsAssembly("ApothecaricApi")));

  services.AddMvc();
}
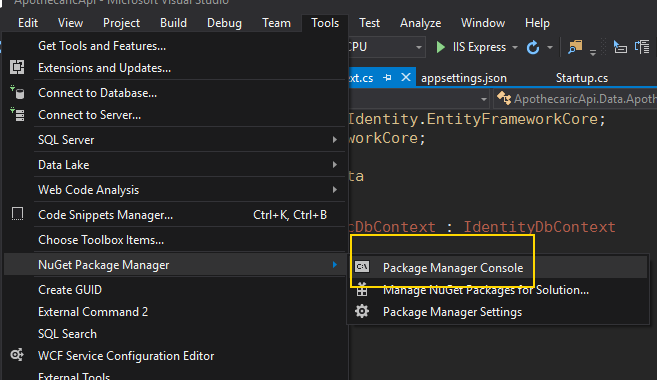
Now we will be able to create our first Migration. The Migration will be able to create the Asp.Net Identity database for us. To start, open the Package Manager Console in Visual Studio.
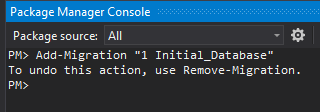
Enter in [Add-Migration “NameYourMigrationHere”] and give your Migration a name. I used “1 Initial_Database”.
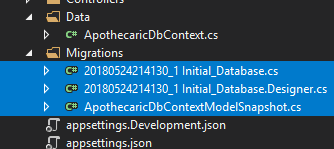
When the Migration completes, you will have a new Folder named “Migrations” in your solution and that folder will have some new files in it.
If you look at the files, you will see some scaffolding code that creates your database tables. I will go ahead and tell Visual Studio to push that migration to my database and create the database and all of its tables.
And A Database!
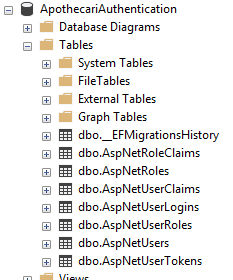
To create the initial database and tables, go back the the Package Manager Console and enter in “Update-Database”. If all is right, the console should give you the “Done” success message. Then go peek at the database that it created for you.
And a peek at the database.
These are the tables that are needed to Asp.Net Identity.
In the next series of posts, we will expand this to use a custom Identity User class, add tables for Multi-Tenancy, serve out Jwt Tokens for Authentication, implement Refresh Tokens, capture the Multi Tenant using middleware, implement global exception handling, introduce swagger to document your API, and add logging using Serilog.
Whew, that is a bit but it is not too bad.
Stick around for more!

