
No Sql Server installation required!
I have searched and found a way for me to run the developer version of Sql Server 2016 on my SSMS on my development machine and I can spin up my Sql Server instance (or additional instances for that matter) whenever I need. And when I don’t need it, Sql Server is not still running in the background slowing up my boot or taking up resources.
This took me a bit of investigation and trial-and-error. I don’t know if I have everything exactly correct and I welcome any feedback so that I can make this better and more correct.
So after installing Docker for Windows on my Windows 10 machine, I brought down the Sql Server 2016 Developer Edition image from Docker Hub. (mcr.microsoft.com/mssql/server)
Now that I had that image locally, I started creating a Docker Compose (YAML) file. I created the directory “C:\Docker\compose” and created the yaml file named “docker-compose.yml” Here it is:
1
2
3
4
5
6
7
8
9
10
11
12
13
14
15
16
17
18
19
20
21
22
23
24
25
26
27
28
29
30
31
32
33
34
35
36
# specify the compose file format
# this depends on what version of docker is running
version: '3.2'


# define our services, all database containers
# each section specifies a container...
# the dockerfile name and location...
# port number & sa password
services:
  developmentSqlServer:
    image: microsoft/mssql-server-windows-developer
    environment:
      sa_password: Reallybitchinpassword1!
      accept_eula: Y
    ports:
      - '15785:1433'
    networks:
      dvlpnet:
        ipv4_address: 172.22.0.20
    container_name: devDbServer
    volumes:
      - type: bind
        source: c:\data
        target: c:\data


networks:
  dvlpnet:
    ipam:
      config:
        - subnet: 172.22.0.0/24
        # gateway: 172.22.0.1 # This is not available in in version 3+ yet.

volumes:
 data:
To break this file up, let’s look at a few lines at a time.
1
version: '3.2'
First thing in the compose file we set the version of compose we want to run our file against. I have played with many versions of this and have found that features in the compose file can vary greatly from version to version. This was cumbersome when trying to learn to put together a compose file.
1
2
3
services:
  developmentSqlServer:
    image: microsoft/mssql-server-windows-developer
Next we declare the services that we want to spin up on Docker. Here, I want to create a Service called “developmentSqlServer” and assign the Sql Server 2016 Developer Edition image to it. Remember, I have already downloaded the image to my Docker environment. When I spin this up and compose it, Docker will grab my local image of Sql Server and not have to grab it from Docker Hub each time.
1
2
3
environment:
  sa_password: Reallybitchinpassword1!
  accept_eula: Y
The Environment piece lets us set the admin password on Sql Server’s sa account and also we need to accept the Sql Server licensing agreement. This is a must.
1
2
ports:
   - '15785:1433'
Here we assign the port that Docker has my Sql Server running on and we assign that internal port to the usual port 1433 for connectivity outside of the Docker container. SSMS can now connect much easier and I don’t have to specify a custom port when I use SSMS to connect to the database server.
1
2
3
networks:
  dvlpnet:
    ipv4_address: 172.22.0.20
Here I am assigning my “developmentSqlServer” service to run on a custom Docker network. We will see in a bit how to set up this network in the compose file also. In my dvlpnet network, I want my Sql Server instance to be assigned the IP address “172.22.0.20”. This way, when my container runs, my service (and Sql Server) will run on the same IP address every time. I won’t have to to inspect the container to find out what IP address Docker has assigned to it on every startup.
1
container_name: devDbServer
We need a name for our container, don’t we? I am using this container to run a Sql Server for my development efforts so I aptly name the container “devDbServer”. This will be the name of the container that will be running in Docker.
1
2
3
4
volumes:
  - type: bind
    source: c:\data
    target: c:\data
So here I want to allow my Docker container to have access to a directory on my development machine. I have already created the “data” directory on my C:\ drive. We will see in a bit that we can save our database (mdf and ldf files) to this location and preserve our database for future use. We will also see how to set up the volumes later in the compose file.
1
2
3
4
5
6
networks:
  dvlpnet:
    ipam:
      config:
        - subnet: 172.22.0.0/24
          # gateway: 172.22.0.1 # This is not available in in version 3+ yet.
Ah, networks. So here is the place where we define our custom network that assinged to our container in our “deveopmentSqlSever” Compose service. I set up my network to use the starting IP of 172.22.0.0 and allowed for 24 additional IP addresses to be used in this network, with 172.22.0.20 being used by my Sql Server container. In older versions of Docker Compose, you were able to set an IP as the Gateway. In version 3.2 here, that is not available. I think that the gateway may become part of a newer version of Docker Compose so I keep this line around to remind me.
Last, we define what our shared Volumes should be. Here I only have one a the moment. Here we just have to tell Docker Compose to use the “data” directory that we had assigned up in our “deveopmentSqlSever” Compose service.
Kick Off The Compose
Now that I have this all set up, I wrote a Powershell script to kick off the Compose for me. That way I don’t have to type in in a command line all the time. When I want my Sql Server, I just have to run this Powershell script. Pretty Nice!
1
2
3
4
5
6
7
8
9
10
cd C:\Docker\compose

#docker-compose stop

docker-compose down -v

#docker stop devDbServer
#docker rm devDbServer

docker-compose up -d
So first we have Powershell move to the directory where we house our Docker Compose (YAML) file. From there I call the Docker Compose down command and send in the -v parameter. This just ensures that every thing is down and clean. Nothing defined in our compose fill will be running then. You will notice that I have commented out the “stop” command. I want to keep this around but don’t really need it when using the “down” command. the “-v” parameter makes sure that everything is taken down; the custom network, containers, and volumes that we set up in our compose file. If you want a consise and informative read on “down vs stop”, check out this Post. I have also commented out the container stop and remove commands since I don’t really need them for the clean up…but I keep them around because…well….just because. The last part is to compose and bring up the services that we created in our yaml file. Now I have a clean instance of my container, network, and volumes.
Create A Database
We can create a new database from the Sql Server instance running in our container now. We will then save that new database to our shared volume so that we can use that later.
Connect to our Sql Server running in our container:
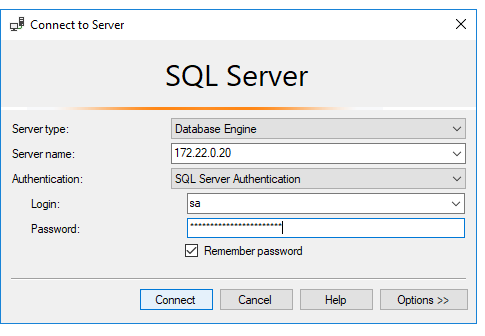
The Server name is the IP address that we assigned our database server in the compose file. Also, the password is the same as we set in the compose file as well.

Let’s create that new database. Select “New Database” from our SSMS Object Explorer after we connect to the Sql Server.
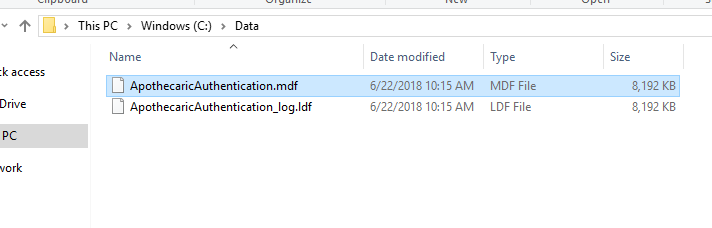
From here, select a name for your new database and set the path to your shared directory. Mine was C:\Data\. This will save the database files to our local machine.


If you leave the Path as default, the database will be saved just to the container and when the container disappears or stops running, your database will be gone too. Sometimes this is a very desired behavior but not for me on this leaning path. I want to reattach this database again when I start up my container in Docker Compose. But before we look at that, I will take a peek at my C:\Data directory and rejoice to see my new database had saved locally!!
Let’s Use It Again!
So what if I want to use this new database everytime I start up my Docker Compose file and get my new Sql Server container running? It looks pretty easy and is easy to do. It just wasn’t easy to get working on Windows at first.
Back in our compose file, add the attach_dbs line under our Environment designation. The hard part here was figuring out the four backslashed needed in the file. Make sure to escape file paths in the yaml file with \\\\. I tried two, then three…didn’t figure I needed four until I searched for a bit on the interwebs.
1
2
3
4
environment:
  sa_password: Reallybitchinpassword1!
  accept_eula: Y
  attach_dbs: "[{'dbName':'ApothecaricAuthentication','dbFiles':['C:\\\\data\\\\ApothercaricAuthentication.mdf','C:\\\\data\\\\ApothecaricAuthentication_log.ldf']}]"
If we run our Powershell script again, which clears out everything and spins up our compose file again, we can see our database has been added to the Sql Server and is ready for us to further our development efforts. Also note that any data you set in this database will be saved between your container sessions because the database is persisted to our local machine and not just residing in the Docker container.