
We now need something to call our gRPC services. Here I will create an Asp.Net Core Web Api. I would look at this as the application’s gateway to the microservices.
I decided to break out this piece into three posts. The others are:
- Part 1 – gRPC Authentication Microservice in .Net Core 3.0
- Part 3 – Adding Asp.Net Identity to a .Net gRPC Service. (still to come)
The corresponding code for this post is located on GitHub.
Please note that the code demonstrated here is for illustration and learning, not production. I have not broken out code into separate classes much just to keep things as simple to follow as possible.
Let’s Get Started
We will start by adding an ASP.NET Core Web Application to the solution that we created in the previous article.
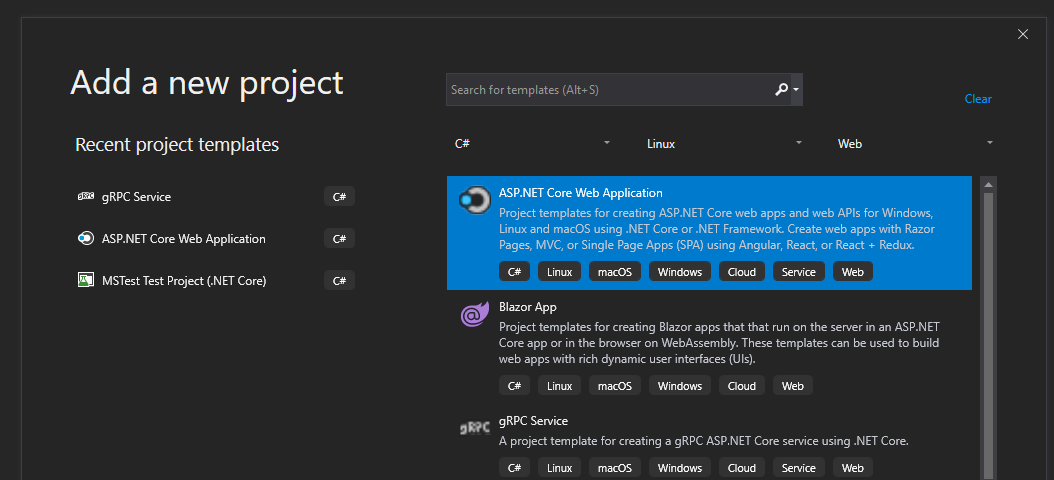
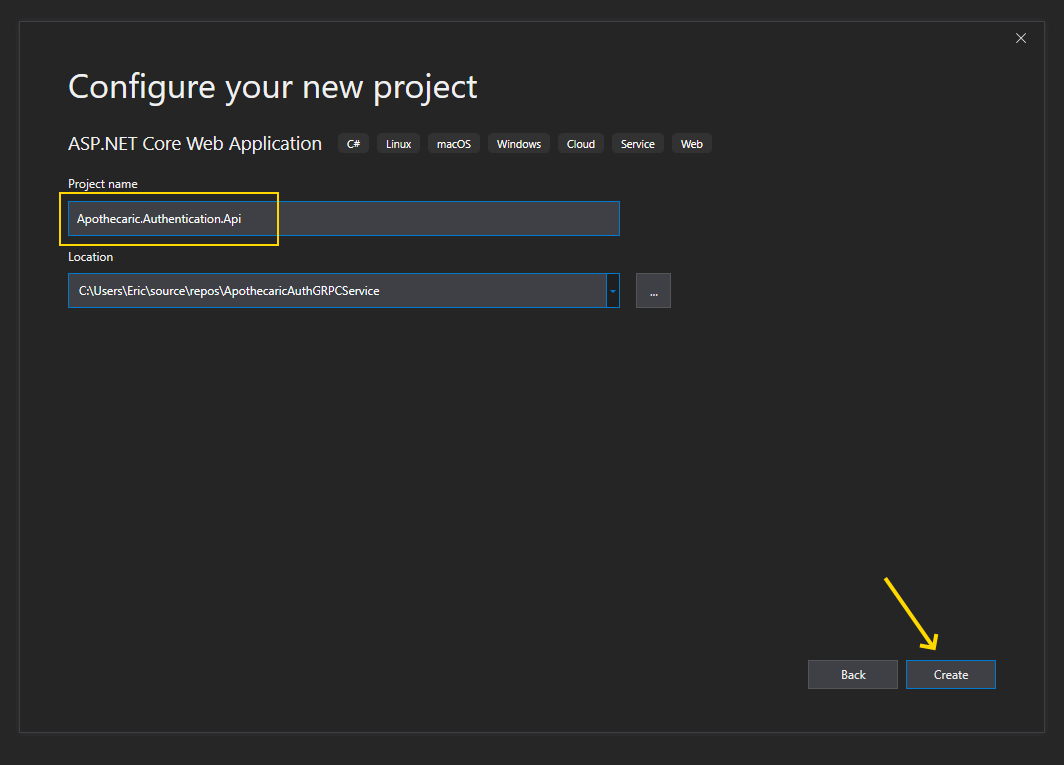
I will name the project “Apothecaric.Authentication.Api”. And then let’s Create!
Let’s create an Api project that targets the .Net Core .30 framework. We will with no authentication and keep the default checks for HTTPS and Enabling Docker.
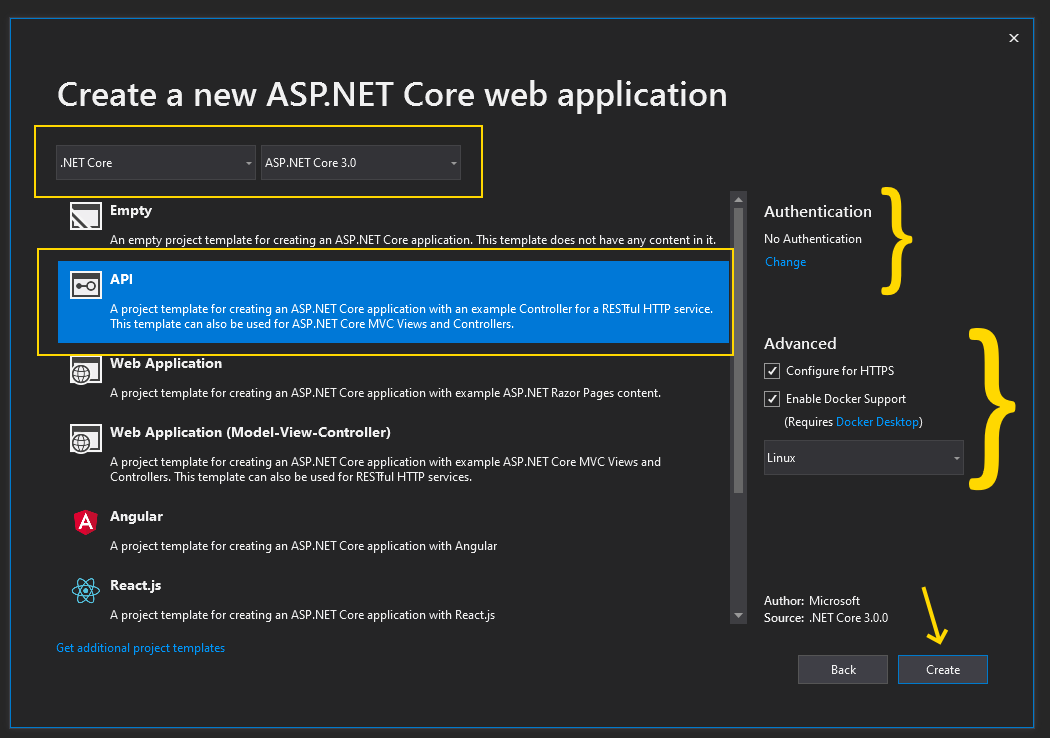
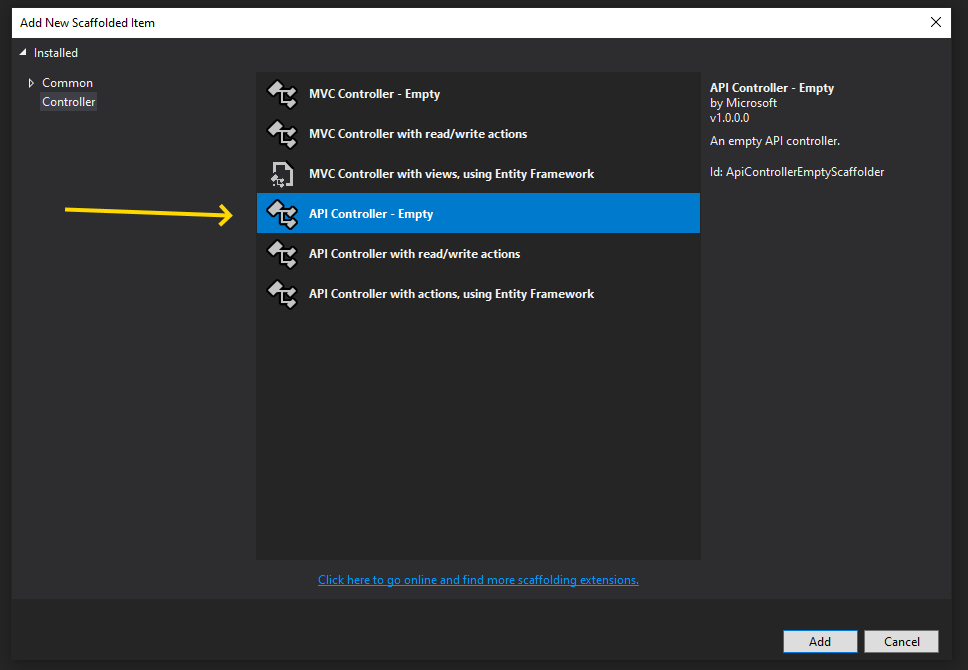
We will then select the Empty Api Controller.
Clear Up Some Template Files
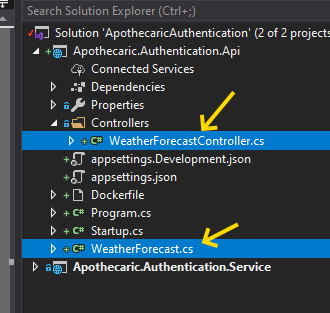
Now let’s clean up a couple of files that were created with the Api template. Delete the WeatherForcast.cs file in the root of the project and also the WeatherForecastController.cs file from the Controllers folder.
Start With A Controller
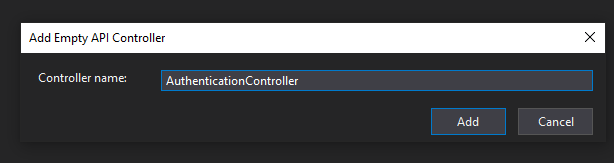
Now right click on the Controller menu and select Add -> Controller. I will name this Controller AuthenticationController.
Protos Again
Before we code out our new Authentication Controller, we need to allow the build process to create some code files for us in order for us to connect to, and consume the gRPC Authentication Services. Usually you would keep a directory with proto files and you could share that proto directory with several projects.
For simplicity’s sake, let’s just copy the proto file from our Apothecaric.Authentication.Service project.
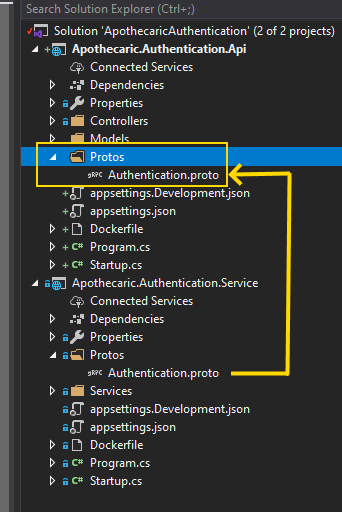
Create a Protos folder in the Apothecaric.Authentication.Api project and copy the Authentication.proto file from our Service project, into our Api project.
Edit Project File
Next we will adjust our Apothecaric.Authentication.Api project file to allow the build creation of the Client Authentication files we need to connect to the Service.
Open up the project file and delete the ItemGroup that holds our newly copied Authentication.proto file. This is just a “new file” designation.
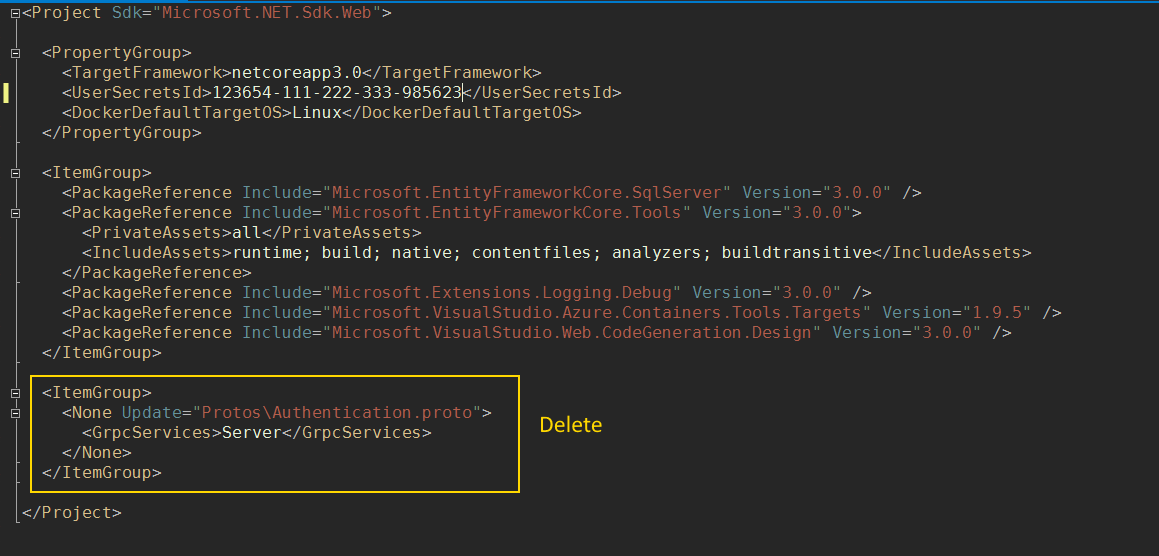
Now add the path to the Authentication.protos file to the project file. This time, however, we want to designate that the files created for gRPC be Client files and NOT Server files. We want to consume the services in our Api project, not serve them!
Your project file should look something similar to this:
1
2
3
4
5
6
7
8
9
10
11
12
13
14
15
16
17
18
19
20
21
22
23
24
<Project Sdk="Microsoft.NET.Sdk.Web">

  <PropertyGroup>
    <TargetFramework>netcoreapp3.0</TargetFramework>
    <UserSecretsId>123456-2222-4444-aaaa-98654321</UserSecretsId>
    <DockerDefaultTargetOS>Linux</DockerDefaultTargetOS>
  </PropertyGroup>

  <ItemGroup>
    <PackageReference Include="Microsoft.EntityFrameworkCore.SqlServer" Version="3.1.0" />
    <PackageReference Include="Microsoft.EntityFrameworkCore.Tools" Version="3.1.0">
      <PrivateAssets>all</PrivateAssets>
      <IncludeAssets>runtime; build; native; contentfiles; analyzers; buildtransitive</IncludeAssets>
    </PackageReference>
    <PackageReference Include="Microsoft.Extensions.Logging.Debug" Version="3.1.0" />
    <PackageReference Include="Microsoft.VisualStudio.Azure.Containers.Tools.Targets" Version="1.9.5" />
   <PackageReference Include="Microsoft.VisualStudio.Web.CodeGeneration.Design" Version="3.1.0" />
  </ItemGroup>

  <ItemGroup>
    <Protobuf Include="Protos\Authentication.proto" GrpcServices="Client" />
  </ItemGroup>

</Project>
Again, don’t forget to designate Client for the type of GrpServices.
1
<Protobuf Include="Protos\Authentication.proto" GrpcServices="Client" />
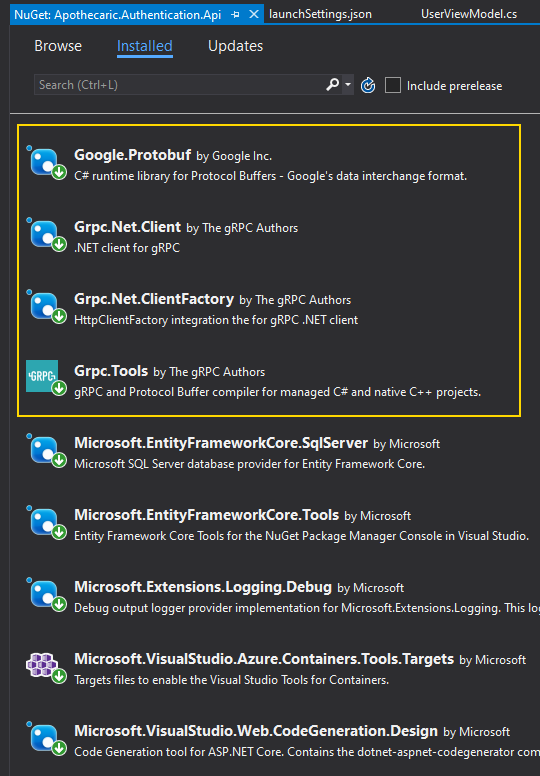
Needed Nuget Packages.
We also need some packages from Nuget in order for our gRPC-based files to be created. In our Service project, the template took care of this for us. In the Api project, we need to go grab some dependencies.
Add the following Nuget packages to our Apothecaric.Authentication.Api project.
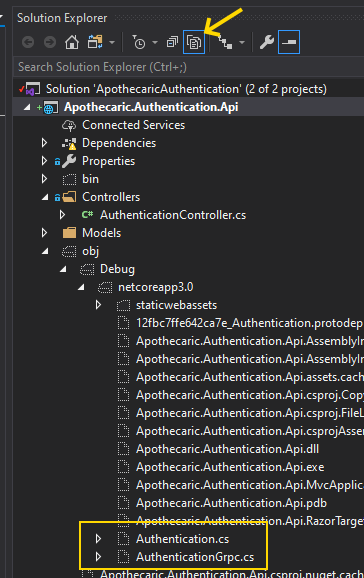
Time For A Build
Now build (or sometimes rebuild) the solution and our client Authentication gRPC files should be created.
After the build, we can look for our newly created Client Authentication.cs and AuthenticationGrpc.cs files. These are in much of the same location as the Service project.
Back To The Controller
Our AuthenticationController code:
1
2
3
4
5
6
7
8
9
10
11
12
13
14
15
16
17
18
19
20
21
22
23
24
25
26
27
28
29
30
31
32
33
34
35
36
37
38
39
40
41
42
43
44
45
46
47
48
49
50
51
52
53
54
55
56
57
58
[Route("api/[controller]")]
[ApiController]
public class AuthenticationController : ControllerBase
{
[HttpPost]
[AllowAnonymous]
[Route("Token")]
public async Task<IActionResult> CreateToken([FromBody] LoginViewModel login)
{
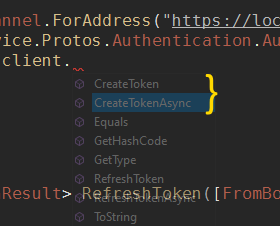
var channel = GrpcChannel.ForAddress("https://localhost:5001");
var client = new Service.Protos.Authentication.AuthenticationClient(channel);
var request = new LoginRequest
{
Email = login.Email,
Password = login.Password
};
var response = await client.CreateTokenAsync(request);
if (response != null)
{
return Ok(response);
}
else
{
return Unauthorized();
}
}
[HttpPost]
[AllowAnonymous]
[Route("Token/Refresh")]
public async Task<IActionResult> RefreshToken([FromBody] UserViewModel user)
{
var channel = GrpcChannel.ForAddress("https://localhost:5001");
var client = new Service.Protos.Authentication.AuthenticationClient(channel);
var request = new RefreshTokenRequest
{
AuthToken = user.AuthToken,
RefreshToken = user.RefreshToken,
FirstName = user.FirstName,
LastName = user.LastName
};
var response = await client.RefreshTokenAsync(request);
if (response != null)
{
return Ok(response);
}
else
{
return Unauthorized();
}
}
}
In both of our methods we need to define our gPRC Channel. Remember from when we created our Service project, the Apothecaric.Authentication.Service project will run on port 5001. Here we point to that service.
1
var channel = GrpcChannel.ForAddress("https://localhost:5001");
Then we create our client. This is the object where we will make our method calls from.
1
var client = new Service.Protos.Authentication.AuthenticationClient(channel);
In the next step were we create our Request object, would usually be a great place to use a tool like AutoMapper. Again, we are keeping things simple for now.
1
2
3
4
5
var request = new LoginRequest
{
      Email = login.Email,
      Password = login.Password
};
After the request data is all set, we can make our method call and set our response.
1
var response = await client.CreateTokenAsync(request);
Notice that we have chosen to call the Async methods. Yes! Async and Sync methods were created for us with the Client build.
Then we just check for an object in our response and, for now, just send back the mocked data we get returned from our Service.
1
2
3
4
5
6
7
8
if (response != null)
{
    return Ok(response);
}
else
{
    return Unauthorized();
}
One More Thing Before We Run
Now that we have more than one project to run, we need to set up for starting multiple projects.
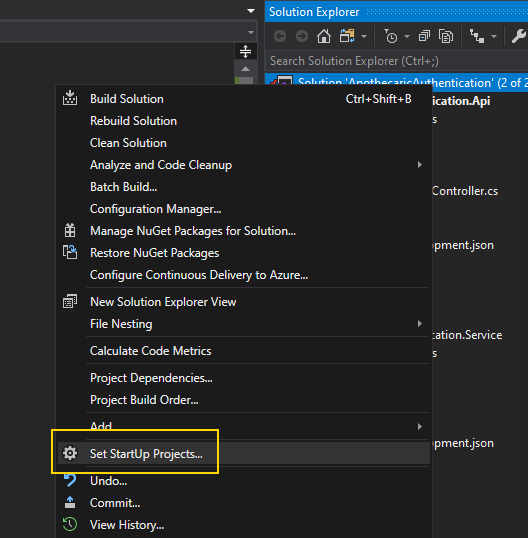
Right click on the Solution and choose the Set Startup Projects… context menu option.
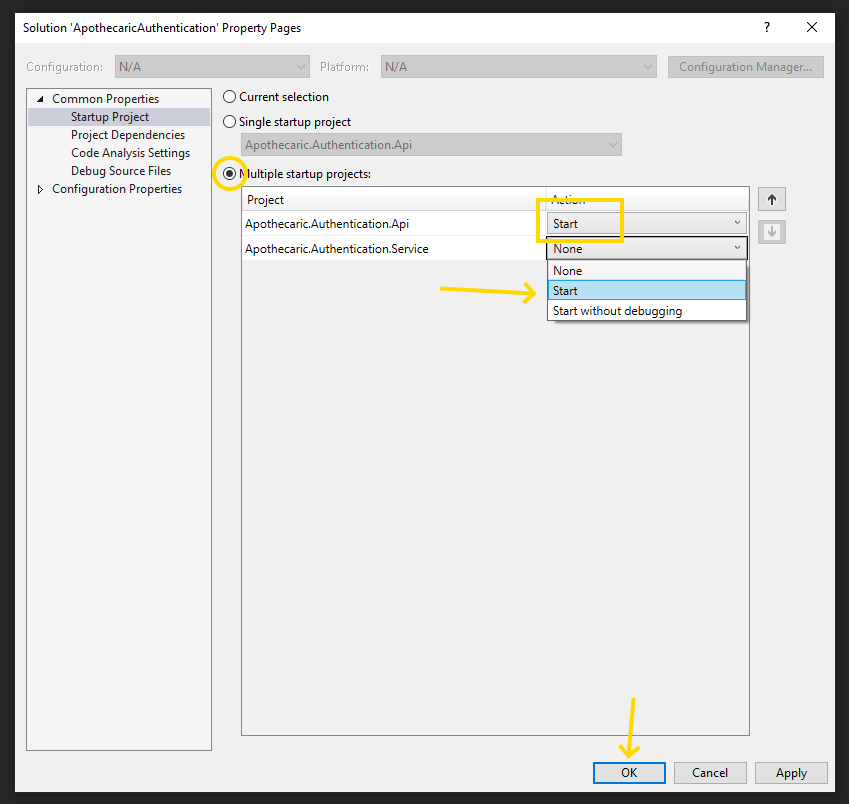
Select the Multiple startup projects radio button and set both of our project to Start in the Actions dropdown. Now both projects will startup when we debug/run our Solution.
Set The Port – Last Step
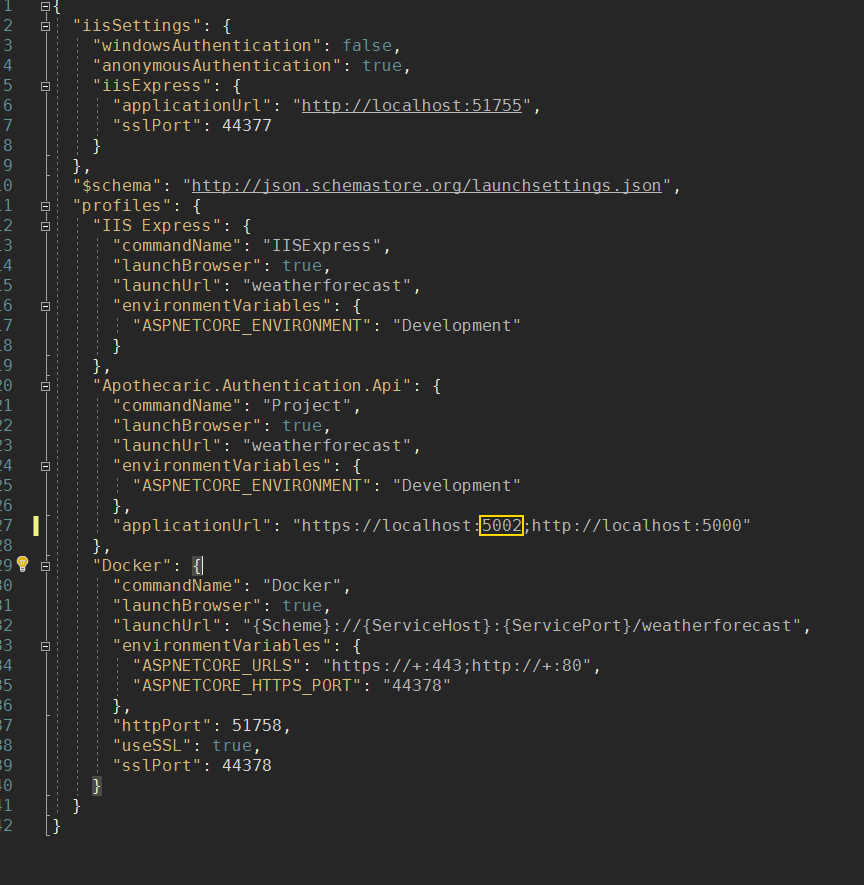
If we leave things alone, both projects will try to run on our localhost’s port 5001. This is the default that the template has set. We will set our Api project to run on port 5002. Collision issue solved.
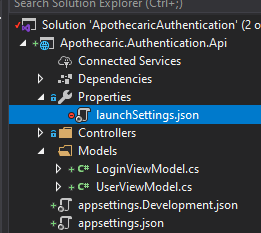
Go into the launchSettings.json file. You can also change this by selecting the Properties context menu if you right click on the project.
In the spot that will run the Kestrel server, update the https port to point to port 5002. You can also change the http port if you are running without https.
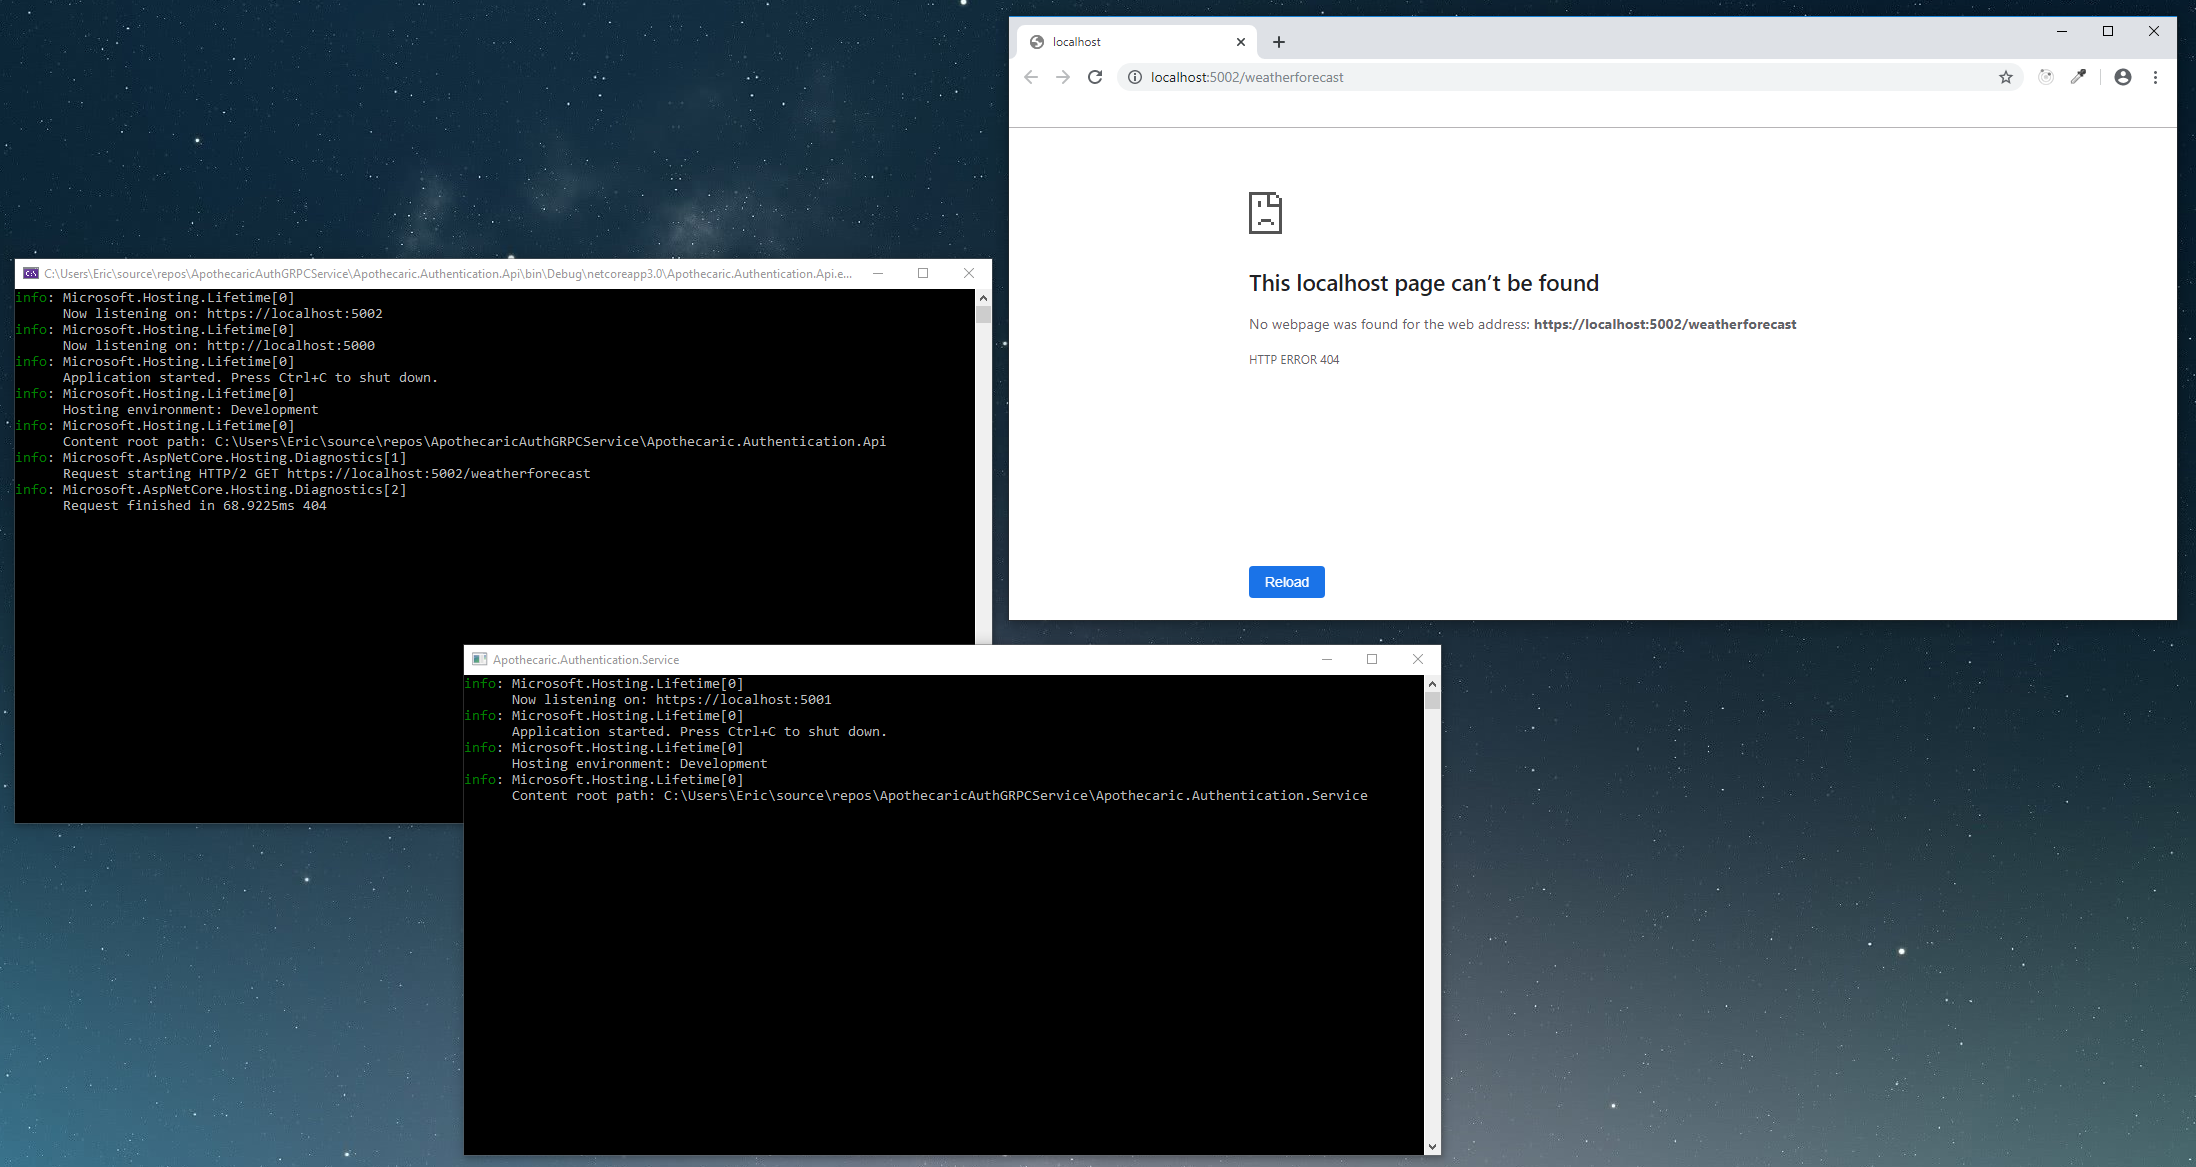
Runnin’
If you run the project now, you should see two command prompts pop up and also your default browser.
Test Call
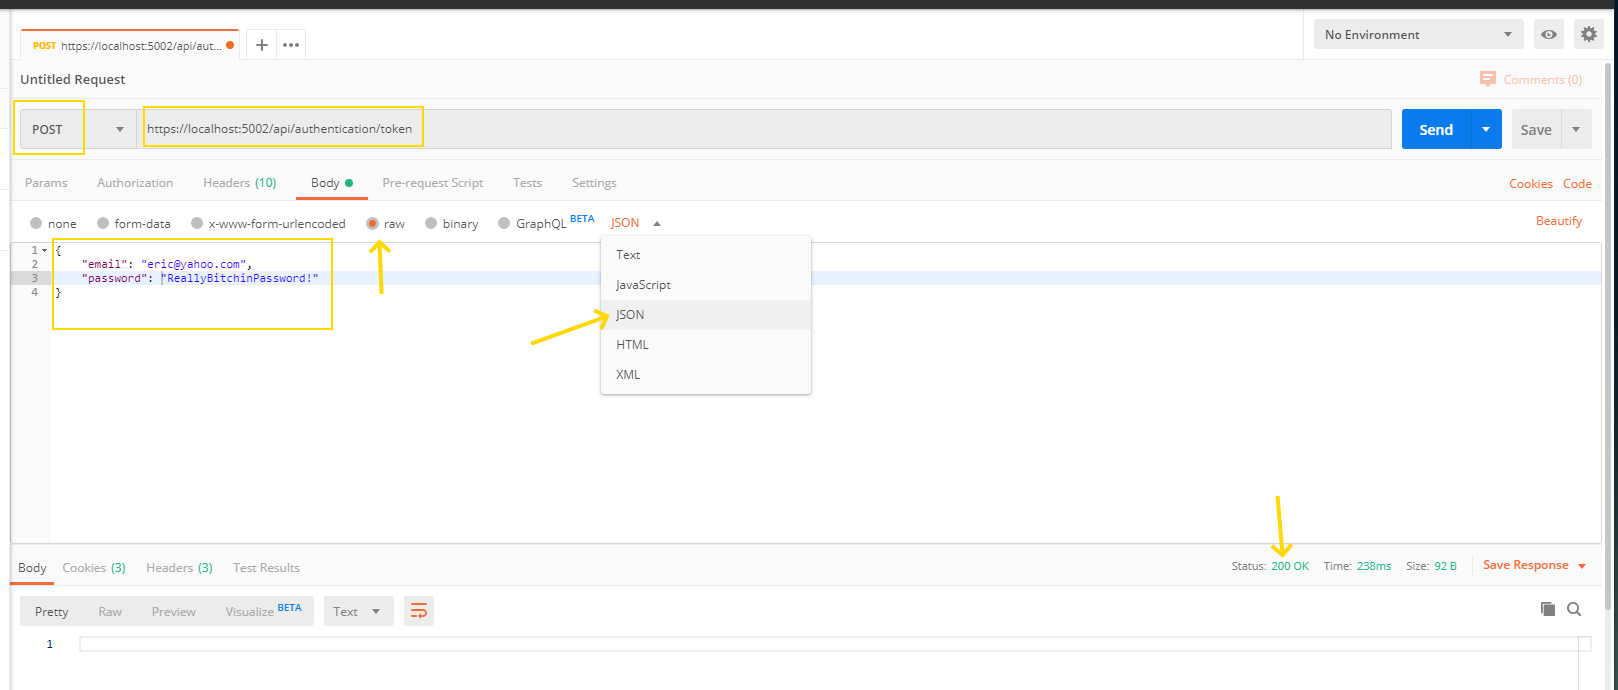
Now we can run Postman and try out our Authentication call.
In Postman, create a POST call that points to https://localhost:5002/api/authentication/token.
For the POST body, make sure you select raw and JSON. We then can create our LoginViewModel JSON object in the POST body.
1
2
3
4
{
  "email": "your@email.com",
  "password": "reallycoolpassword!"
}
If all goes well, you will see the response that you pre-defined in the Service project from the first article.
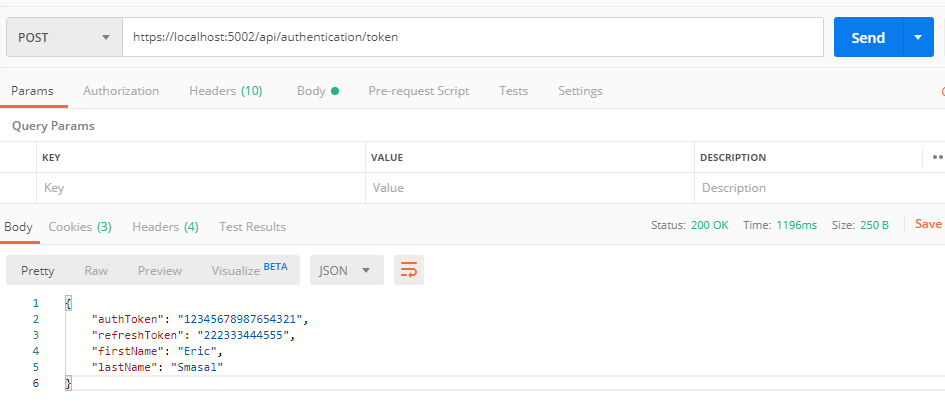
You can then test the Refresh call by creating another Postman POST call that points to https://localhost:5002/api/authentication/token/refresh. Just use the JSON response from the token call in the body of the Refresh call.
Next Steps…
In the next article, we will create a library to do the actual authentication and auth database creation. Stay tuned…..
Hope to see you then!