
Before we put our applications in our cluster, we need a way for those applications and Kubernetes Pods to communicate with each other. There are several ways to do this and the Kubernetes documentation outlines them here. The Nginx Ingress controller is choice I would like to implement. Before we install and configure the Nginx Ingress controller, we need an additional piece of software because we are installing this on bare metal. Intro…MetalLB!
<< Previous Kubernetes Cluster Management
Why Do We Need MetalLB?
Kubernetes does not offer an implementation of network load-balancers (Services of type LoadBalancer) for bare metal clusters. The implementations of Network LB that Kubernetes does ship with are all glue code that calls out to various IaaS platforms (GCP, AWS, Azure…). If you’re not running on a supported IaaS platform (GCP, AWS, Azure…), LoadBalancers will remain in the “pending” state indefinitely when created.
Bare metal cluster operators are left with two lesser tools to bring user traffic into their clusters, “NodePort” and “externalIPs” services. Both of these options have significant downsides for production use, which makes bare metal clusters second class citizens in the Kubernetes ecosystem.
MetalLB aims to redress this imbalance by offering a Network LB implementation that integrates with standard network equipment, so that external services on bare metal clusters also “just work” as much as possible.
The requirements for installing MetalLB are listed here. We should have almost all of those covered except for one. If you have followed the steps that I have outlined in previous posts, you should not have to worry about the port 7946 requirement because we are local and don’t have a firewall within our local network. This item we need to change is the setting the “strictARP” to true in the kube-proxy configman.
Easy enough, we can use these shell commands to get that set for us.
1
2
3
4
5
# see what changes would be made, returns nonzero returncode if different
kubectl get configmap kube-proxy -n kube-system -o yaml | \
sed -e "s/strictARP: false/strictARP: true/" | \
kubectl diff -f - -n kube-system
1
2
3
4
# actually apply the changes, returns nonzero returncode on errors only
kubectl get configmap kube-proxy -n kube-system -o yaml | \
sed -e "s/strictARP: false/strictARP: true/" | \
kubectl apply -f - -n kube-system
Install MetalLB with Helm
Back on our Director VM, we can start the MetalLB installation. The installation of MetalLB is pretty straight-forward.
1
2
kubectl apply -f https://raw.githubusercontent.com/metallb/metallb/v0.10.2/manifests/namespace.yaml
kubectl apply -f https://raw.githubusercontent.com/metallb/metallb/v0.10.2/manifests/metallb.yaml
That’s it! MetalLB is installed.
Now we just need to deploy a Namespace and a ConfigMap for MetalLB. Here is the yaml file I used to deploy the Namespace and ConfigMap. In my case, I am looking to use an IP range of 192.168.86.60 through 192.168.86.69 for my cluster.
1
2
3
4
5
6
7
8
9
10
11
12
13
14
15
16
17
apiVersion: v1
kind: Namespace
metadata:
  name: metallb-system
---
apiVersion: v1
kind: ConfigMap
metadata:
  namespace: metallb-system
  name: config
data:
  config: |
    address-pools:
    - name: default
      protocol: layer2
      addresses:
      - 192.168.86.60-192.168.86.69
I used MobaXterm and copied my yaml file (named metallb-configmap.yaml) to the VM’s “/tmp” directory. Then, to deploy the ConfigMap:
1
2
cd /tmp
kubectl apply -f metallb-configmap.yaml
And we should see:
1
2
namespace/metallb-system created
configmap/config created
Install Nginx Ingress
At this point we are ready to install and configure our Nginx Ingress Controller. To get started, let’s add the ingress controller to to the Helm repository.
1
2
3
helm repo add ingress-nginx https://kubernetes.github.io/ingress-nginx

helm repo update
Change Config for the Nginx Ingress Controller
Next, we need to change some configuration settings in order to get the controller to work with our bare metal cluster.
1
2
3
helm show values ingress-nginx/ingress-nginx > /tmp/ingress-nginx.yaml

nano ingress-nginx.yaml
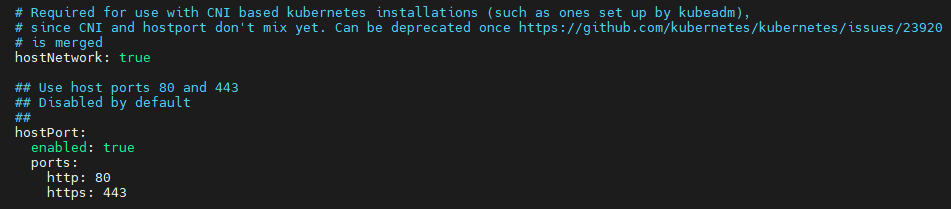
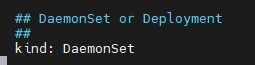
Now that we have the ingress-nginx.yaml file open, we need to find and change 3 values:
- Set hostNetwork to true
- Set hostPort:enabled to true
- Change kind from Deployment to DaemonSet
Start Ingress Controller
Make sure to save off the changes and then let’s enter 2 commands to create a new namespace for our ingress controller and then create our controller bases on the updated yaml file.
1
2
3
kubectl create namespace ingress-nginx

helm install syntak-ingress ingress-nginx/ingress-nginx -n ingress-nginx --values /tmp/ingress-nginx.yaml
To explain that last line a little, here we are using Helm to install the Nginx Ingress Conrotroller and we are naming the Pod/DaemonSet as “syntak-ingress”, then we call out what we want to install which is the “ingress-nginx/ingress-nginx” chart from Helm. We will put this Pod/DaemonSet in the “ingress-nginx” namespace and we will use the config that we updated when we moved the ingress-nginx installation config into the yaml file in the “tmp” directory.
If we run “kubectl -n ingress-nginx get all” now, we should see something like this, and notice the EXTERNAL – IP that is set for our LoadBalancer. This has come from the IP addresses that we set aside in the MetalLB setup.

Remove Webhook
The Ingress installation will add a Validating Webhook that we don’t need hanging around, so I delete this. Based on the name we see in the service that was created “sytnak-ingress-ingress-nginx-controller-admission”, we will use that service name and delete the ValidatingWebhookConfiguration under it.
1
kubectl delete -A ValidatingWebhookConfiguration syntak-ingress-ingress-nginx-admission
In the next post, how about setting up SQL Server in a pod and have a network location where it stores the database files.
>> Next Kubernetes and SQL Server
Hope to see you then!