
So, now I would like to get SQL Server up and running on our home lab Kubernetes Cluster. I also set up a share on my home TrueNas Core server so that I can persist the SQL Server data files. This way, I won’t loose the data when my cluster nodes need to reboot. You can always store data to a node on your cluster if you want, but the home lab that I have set up uses virtual machines for each of the devices on the network. If I would like to use the Cluster for development work, I would like to make sure my data sticks around on a more permanent basis. Also, don’t forget, we had to install nfs-common on all of our cluster virtual machines.
<< Previous Nginx Ingress load balancer and MetalLB
We also want to utilize the Load Balancer that MetalLB provides us so that we can connect to our SQL Server with an IP Address and not have to worry about the Port Number that the NodePort exposes.
File Share
On my TruNAS server, I have created an NFS share mapped to ‘/mnt/ClusterData’. In that share, I have created the directory structure in there of:
1
2
3
/export/volumes/sql/data
/export/volumes/sql/log
/export/volumes/sql/system
Later, we will map directories on our Pods, that SQL Server uses, and map those to the NFS share directories. We will see how this is done a little later when we look at Persistent Volumes and Persistent Volume Claims.
Get The Show Started
The Secret
Let’s start by creating a definition for our database password. Here, we will use a Secret. Here are the contents of our sql-secrets.yaml file.
1
2
3
4
5
6
7
apiVersion: v1
kind: Secret
metadata:
  name: mssql
type: Opaque
  SA_PASSWORD: UmVhbGx5Qml0Y2hpblBhc3N3b3JkIzE=
  # ReallyBitchinPassword#1
Start out be declaring the kind as ‘Secret’ and the name of the secret will be ‘mssql’ and the item in our secret is the ‘SA_PASSWORD’. You can set more items in a secret and I will show that on an upcoming post where we can deploy a MongoDB to Kubernetes. The value of the SA_PASSWORD is ‘ReallyBitchinPassword#1’. For now, we just need the one item in our ‘mssql’ secret. So….now…..looking at the actual value of SA_PASSWORD, you will notice that it doesn’t look like ‘ ReallyBitchinPassword#1’ and that’s because it’s a base64 encoded value. I used base64encode.org to do the encoding.
Persistence Pays Off
In order to persist our data, we need to create 2 things for our deployment to use. First we need a Persistent Volume, which defines where the data should go (maps the data outside the Pod), and Second, a Persistent Volume Claim. The Persistent Volume Claim will tie our Deployment to the Persistent Volume. A great explanation of the different between the tow can be found here.
Persistent Volume
Take a look at the sql-pv.yaml file.
1
2
3
4
5
6
7
8
9
10
11
12
13
14
15
16
17
18
19
20
21
22
23
24
25
26
27
28
29
30
31
32
33
34
35
36
37
38
39
40
41
42
43
44
45
46
47
apiVersion: v1
kind: PersistentVolume
metadata:
  name: pv-nfs-data
  labels:
    disk: data
spec:
  capacity:
    storage: 10Gi
  accessModes:
    - ReadWriteOnce
  persistentVolumeReclaimPolicy: Retain
  nfs:
    server: 192.168.86.111
    path: "/mnt/ClusterData/export/volumes/sql/data"
---
apiVersion: v1
kind: PersistentVolume
metadata:
  name: pv-nfs-log
  labels:
    disk: log
spec:
  capacity:
    storage: 10Gi
  accessModes:
    - ReadWriteOnce
  persistentVolumeReclaimPolicy: Retain
  nfs:
    server: 192.168.86.111
    path: "/mnt/ClusterData/export/volumes/sql/log"
---
apiVersion: v1
kind: PersistentVolume
metadata:
  name: pv-nfs-system
  labels:
    disk: system
spec:
  capacity:
    storage: 10Gi
  accessModes:
    - ReadWriteOnce
  persistentVolumeReclaimPolicy: Retain
  nfs:
    server: 192.168.86.111
    path: "/mnt/ClusterData/export/volumes/sql/system"
In this file, I have defined three Persistent Volumes, ‘pv-nfs-data’, ‘pv-nfs-log’, and ‘pv-nfs-system’. I have set each one to use about 10gb of storage and labeled each one accordingly, ‘data’, ‘log’, and ‘system’. The volumes will be mounted using the access mode of ‘ReadWriteOnce’, which means that the volume can be mounted as read-write by a single node in the Cluster.
Obviously the ‘nfs’ defines what type of share our volume is located in. In my home lab, the TrueNAS server is sitting on IP 192.168.86.111. We then define our paths to the directory structure that we have set up.
Persistent Volume Claim
Next, we will create three Persistent Volume Claims. These are defined in sql-pvc.yaml.
1
2
3
4
5
6
7
8
9
10
11
12
13
14
15
16
17
18
19
20
21
22
23
24
25
26
27
28
29
30
31
32
33
34
35
36
37
38
39
40
41
apiVersion: v1
kind: PersistentVolumeClaim
metadata:
  name: pvc-nfs-data
spec:
  selector:
    matchLabels:
      disk: data
  accessModes:
    - ReadWriteOnce
  resources:
    requests:
      storage: 10Gi
---
apiVersion: v1
kind: PersistentVolumeClaim
metadata:
  name: pvc-nfs-log
spec:
  selector:
    matchLabels:
      disk: log
  accessModes:
    - ReadWriteOnce
  resources:
    requests:
      storage: 10Gi
---
apiVersion: v1
kind: PersistentVolumeClaim
metadata:
  name: pvc-nfs-system
spec:
  selector:
    matchLabels:
      disk: system
  accessModes:
    - ReadWriteOnce
  resources:
    requests:
      storage: 10Gi
The Persistent Volume Claims define the claim’s name, then the selector lets the claim know what Persistent Volume it can tie to. Again, we state the AccessMode and Storage requirements much the same way we did in the Persistent Volume yaml file.
Can I Get Some Service?
Service
Let’s take a look at the sql-service.yaml file.
1
2
3
4
5
6
7
8
9
10
11
12
apiVersion: v1
kind: Service
metadata:
  name: mssql-service
spec:
  selector:
    app: mssql
  ports:
    - protocol: TCP
      port: 1433
      targetPort: 1433
  type: LoadBalancer
This specification creates a Service object named ‘msql-service’, which targets TCP port 1433 on any Pod with the app = mssql label. We will see later that our SQL Server Deployment will have the ‘mssql’ label. The Service will also expose port 1433 out to a LoadBalancer. Speaking of load balancers, we also define the type of this Service to be LoadBalancer. This way, MetalLB (that we installed here) will expose our Service using one of the IP’s in the range that previously set here. Then we can access our SQL Server with an IP address outside of our Cluster.
Deployment
Finally, the last file needed to deploy our SQL Server to the Cluster. Here is the sql-deployment.yaml file.
1
2
3
4
5
6
7
8
9
10
11
12
13
14
15
16
17
18
19
20
21
22
23
24
25
26
27
28
29
30
31
32
33
34
35
36
37
38
39
40
41
42
43
44
45
46
47
48
49
50
51
52
53
54
55
56
apiVersion: apps/v1
kind: Deployment
metadata:
  name: mssql-deployment
spec:
  replicas: 1
  selector:
    matchLabels:
      app: mssql
  strategy:
    type: Recreate
  template:
    metadata:
      labels:
        app: mssql
    spec:
      securityContext:
        fsGroup: 10001
      containers:
      - name: mssql
        image: 'mcr.microsoft.com/mssql/server:2019-latest'
        ports:
        - containerPort: 1433
        env:
        - name: ACCEPT_EULA
          value: 'Y'
        - name: MSSQL_PID
          value: Developer
        - name: SA_PASSWORD
          valueFrom:
            secretKeyRef:
              name: mssql
              key: SA_PASSWORD
        - name: MSSQL_AGENT_ENABLED
          value: 'true'
        - name: MSSQL_DATA_DIR
          value: '/data'
        - name: MSSQL_LOG_DIR
          value: '/log'
        volumeMounts:
        - name: system
          mountPath: /var/opt/mssql
        - name: data
          mountPath: /data
        - name: log
          mountPath: /log
      volumes:
      - name: system
        persistentVolumeClaim:
          claimName: pvc-nfs-system
      - name: data
        persistentVolumeClaim:
          claimName: pvc-nfs-data
      - name: log
        persistentVolumeClaim:
          claimName: pvc-nfs-log
We start by declaring this file a Deployment type and then we give it a name of ‘mssql-deployment’. In the specifications I will set our database to only have 1 instance. We don’t want multiple instances trying to access our database files on the network share. Next we set the label matching and we will set the label connections to ‘mssql’. When the pod fails, we set the strategy to recreate the pod and keep our SQL Server up and running.
In the template, set the app label to ‘mssql’ and then we’ll move to the security and container. For the security entries, my linux instance has the group of 10001 set up that includes the user of Nobody. We need this in order to have SQL Server run under a non-root user and also the user that allows us to connect the Persistent Volumes to the nfs share on the network NAS.
The container settings list out the image that we are to base our SQL Server on along with the port we will use to expose the database server. We will stick with the default 1433 port.
In the environment settings, we set the acceptance of the SQL Server EULA and set the version of the server we are installing as the Developer edition. We then set the SA User password to a secret that we created earlier. We then set if we want SQL Server Agent enabled and then we set the data directories, in the container, where our .log files and where the .mdf (data) files will be stored. The volumeMounts will set our system data files, our mdf (data) files, and log files and list where those will live on the running container.
The volumes section let’s us set the Persistent Volume Claims that will map our volumeMounts to the directories out in the Persistent Volumes (physical locations on the nfs network share).
Deploy
In order to deploy SQL Server, copy the yaml files to a place on your Director VM or your Control Plane VM and then navigate to the directory where you copied your files.
Then, on the command line run the following:
1
2
3
4
5
kubectl apply -f sql-secrets.yaml
kubectl apply -f sql-pv.yaml
kubectl apply -f sql-pvc.yaml
kubectl apply -f sql-service.yaml
kubectl apply -f sql-deployment.yaml
To watch the instances come up and detect when their state changes, you can get the Pods and watch them.
1
kubectl get pods --watch
Now you can watch as the SQL Server pod comes to life.

Once the Pod is up and running, we can try to connect to it. First we have to grab the IP address that was assigned to our service that exposes the SQL Server. Remember, MetalLB will provide a LoadBalancer for us to expose our SQL Server to an IP address. Let’s see what that is.

Use the get services command and look for our service named ‘mssql-service’. From what we see here, our LoadBalancer service was giving an IP address of 192.168.86.61 from MetalLB. We will use that IP address to connect to SQL Server.
I will fire up SSMS and use the IP address along with the password that we created in our Secret to make the connection.
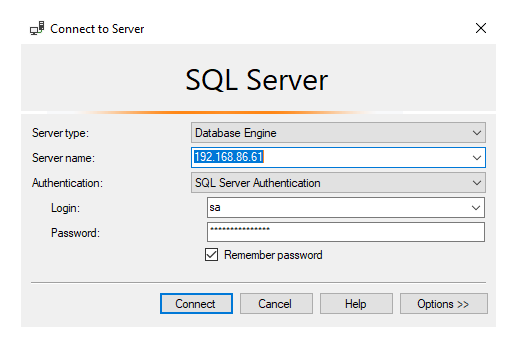
All that’s left is to hit the ‘Connect’ button and see what happens.
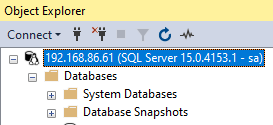
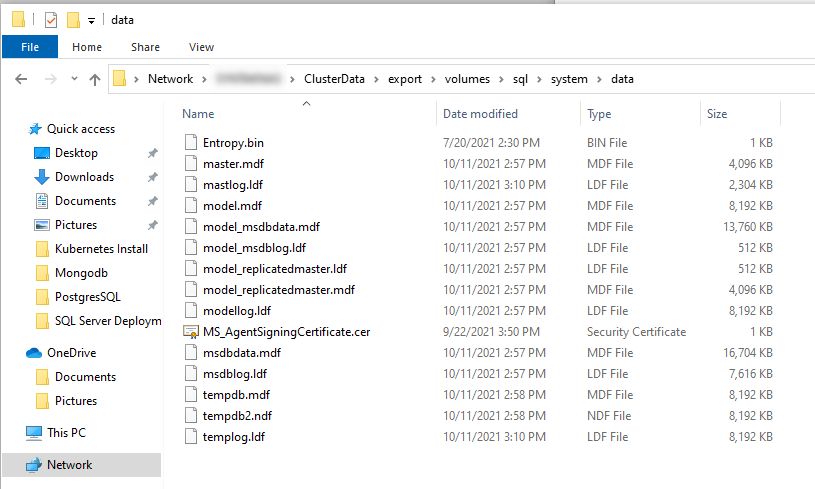
We have made a connection to SQL Server and all of the default databases were in place. Here is a look at some of the default files SQL Server creates.
For next installment, I will deploy Mongodb on Kubernetes using the nfs share to persist the data files. Then we will take a look at doing the same for PostreSQL.
Hope to see you then!